If you’ve ever noticed your Windows 10 computer slowing down or the fan whirring loudly, there’s a chance the WMI Provider Host is to blame. The WMI Provider Host, short for Windows Management Instrumentation, is a crucial component of the Windows operating system. However, at times, it can lead to high CPU usage, causing performance issues. In this comprehensive guide, we’ll delve into the intricacies of WMI Provider Host, explore the reasons behind its high CPU usage, and most importantly, provide effective solutions to fix this common Windows 10 problem.
Understanding WMI Provider Host

Before we embark on our troubleshooting journey, let’s grasp the basics of WMI Provider Host. In essence, WMI is a Microsoft technology that allows for the management of system resources, applications, and devices in a network. The Provider Host is responsible for facilitating communication between management applications and the Windows operating system.
The Culprits Behind High CPU Usage
High CPU usage by WMI Provider Host can be attributed to various factors. One common cause is misbehaving or corrupt services and processes that rely on WMI. Additionally, issues with the WMI repository or conflicts with third-party applications can also contribute to the CPU usage spike.
Identifying the Issue: Symptoms of High CPU Usage
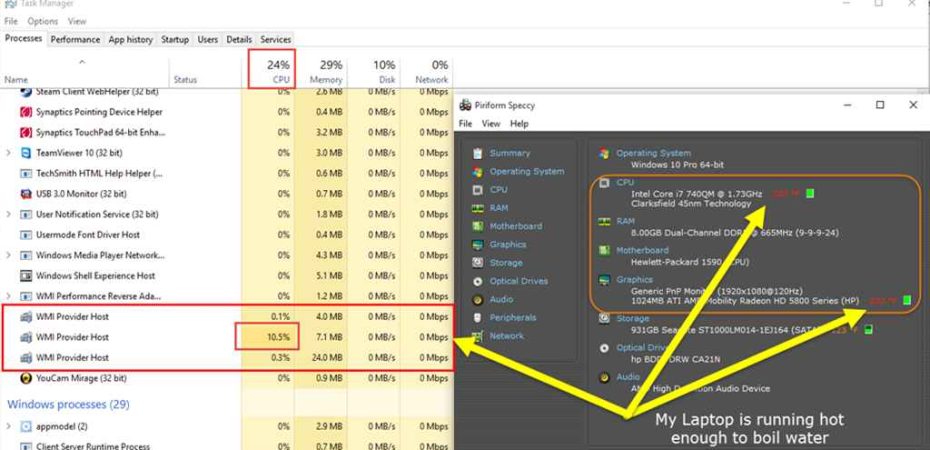
Before diving into the solutions, it’s crucial to identify whether your system is indeed affected by high WMI Provider Host CPU usage. Common symptoms include sluggish system performance, unresponsive applications, and a noticeable increase in fan noise due to heightened CPU activity.
Solutions to Tame WMI Provider Host
1. Restarting WMI Provider Host Service
A simple yet effective solution is restarting the WMI Provider Host service. This can be done through the Windows Services application. Navigate to the “Services” application, locate “Windows Management Instrumentation,” right-click, and select “Restart.”
2. Verifying and Repairing WMI Repository
The WMI repository might be the root cause of the issue. To address this, open a Command Prompt with administrative privileges and run the command winmgmt /verifyrepository. If issues are detected, run winmgmt /salvagerepository to attempt repairs.
3. Identifying and Disabling Problematic Services
Use the Task Manager to identify services causing excessive CPU usage. Navigate to the “Processes” tab, locate the WMI Provider Host, right-click, and choose “Go to Details.” From there, you can identify the specific services causing the problem.
4. Updating Device Drivers
Outdated or incompatible device drivers can contribute to WMI-related issues. Ensure all your device drivers are up to date by visiting the official websites of your hardware components or using Windows Update.
5. Scanning for Malware
Malware can disguise itself and cause system disruptions. Perform a thorough malware scan using a reputable antivirus or antimalware tool to rule out malicious activity.
6. Adjusting WMI Provider Host Settings
Fine-tuning WMI Provider Host settings can sometimes alleviate CPU usage. Open the “Run” dialog, type services.msc, locate “Windows Management Instrumentation,” right-click, select “Properties,” and tweak the settings under the “Recovery” tab.
FAQs (Frequently Asked Questions)
Q1: What is WMI Provider Host, and why does it cause high CPU usage?
A1: WMI Provider Host is a component of the Windows operating system responsible for managing system resources. High CPU usage can occur due to misbehaving services, issues with the WMI repository, or conflicts with third-party applications.
Q2: How can I identify if WMI Provider Host is causing high CPU usage on my Windows 10 system?
A2: Look for symptoms such as sluggish performance, unresponsive applications, and increased fan noise. Use the Task Manager to check CPU usage, and if WMI Provider Host is consuming a significant amount, it might be the culprit.
Q3: Is restarting the WMI Provider Host service a permanent solution?
A3: While restarting the service can provide a quick fix, it may not be a permanent solution. It’s recommended to explore other troubleshooting steps, such as verifying and repairing the WMI repository, for a more lasting resolution.
Q4: Can outdated device drivers contribute to WMI-related issues?
A4: Yes, outdated or incompatible device drivers can contribute to high CPU usage by WMI Provider Host. Ensure all your device drivers are up to date to prevent such issues.
Q5: How often should I perform a malware scan to rule out malicious activity?
A5: Regular malware scans are advisable for overall system security. Perform a scan at least once a week using a reputable antivirus or antimalware tool.
Q6: Are there specific settings in WMI Provider Host that I can adjust to reduce CPU usage?
A6: Yes, you can fine-tune WMI Provider Host settings by accessing the “Services” application, locating “Windows Management Instrumentation,” and adjusting settings under the “Recovery” tab.
Conclusion: A Swift Resolution to WMI Woes
In conclusion, the WMI Provider Host’s high CPU usage on Windows 10 can be a perplexing issue, but armed with the right knowledge, you can efficiently troubleshoot and resolve it. Whether it’s restarting services, repairing the WMI repository, or updating drivers, these solutions ensure a smoother and more responsive Windows experience. Implement these steps, and bid farewell to the frustrations of a lagging system, as you regain control over your Windows 10 performance.
Read also:
- Tiworker.exe High CPU and Disk Usage: 10 Ways to Tackle the Issue
- What’s System Interrupts High CPU Usage in Windows 10
- APU Vs CPU Vs GPU – What’s the difference?
- The Complete Guide to Fix OBS Studio NVENC Errors
- 3 Best Accurate Bottleneck Calculators for PC to Use in 2023
- AMDRSServ.exe: What Is It & How to Fix It in 7 Easy Steps
- What is Microsoft Math Solver and How to Use It
- How to Get the Microsoft Teams Machine Wide Installer
- DISM Error 87 On Windows: Causes & Quick Fixes

